Quickstart: run the demo (YAML + CLI)
Background. A habitat map paints every voxel inside the tumour with a habitat id, so the tumour is split into sub-regions that behave alike across the input images.
Purpose. Run the two-step demo from a YAML file with the habit
command and get habitat maps plus a habitat feature table under
demo_data/results/. It is the same analysis as the Python and YAML
quickstart pages, with the same result.
Key terms.
habitat – a sub-region inside the tumour (the ROI) whose voxels behave alike across the input images; HABIT paints each ROI voxel with a habitat id (1, 2, 3, …).
YAML config – a text file that lists the analysis stages and says where to read the data and write the results;
habit get-habitat --config <file>runs it.two-step – each tumour is first cut into supervoxels, then the supervoxels of all subjects are clustered together once, so habitat ids mean the same thing in every patient.
No Python required. Install first (Installation).
You do not need a git clone: pip install habitat-analysis is enough.
1. Work directory and demo configs
Pick a folder you own (<work_dir>). In a conda terminal:
# Windows — Anaconda Prompt (not plain CMD)
conda activate habit          # prompt must show (habit)
mkdir D:\my_habit_work
cd D:\my_habit_work
habit copy-demo-config --dest .

# macOS / Linux
conda activate habit
mkdir -p ~/my_habit_work && cd ~/my_habit_work
habit copy-demo-config --dest .
This writes <work_dir>/config/. Imaging data is not in the wheel;
fetch it next (once).
2. Get demo data
From <work_dir>:
habit fetch-demo --work-dir .
The first call downloads the official 5-subject preprocessed pack (about
473 MB) into %USERPROFILE%\.habit_data\demo-data-v1\preprocessed
(or $HOME/.habit_data/...). Later calls reuse that cache. The command
prints the absolute path and the folder tree — that tree is what your
data must look like (same images/<id>/<series>/ +
masks/<id>/<roi>/ layout; change IDs and series names).
--work-dir . also creates <work_dir>/demo_data/preprocessed pointing
at the cache so the shipped YAML ../../demo_data/preprocessed paths keep
working.
Preprocessed images are already included — skip preprocess on the first run.
If GitHub is unreachable, the imaging zip is also on the backup share
(Download preprocessed.zip, code 9bi3). Extract so you have
demo_data/preprocessed/images/ and masks/.
3. Activate and check
Stay in the conda env from Installation. From <work_dir>:
# Windows — Anaconda Prompt
conda activate habit
cd D:\my_habit_work

# macOS / Linux
conda activate habit
cd ~/my_habit_work

habit --version
4. Run
config/habitat/config_habitat_quickstart_v1.yaml is the analysis of the
Python and YAML quickstart pages
(Quickstart: Python API,
Quickstart: YAML): raw intensities of the four
DCE phases inside the LAP ROI, 30 supervoxels per tumour, one k-means fit
over the pooled supervoxels (2 to 10 habitats, elbow), seed 0, fitted on
subj001 to subj004. The subjects are listed in the manifest
config/habitat/file_habitat_quickstart.yaml. All three pages give the
same habitat maps (5 habitats, identical labels voxel by voxel) and the
same feature values. From <work_dir>:
habit check-config --config config/habitat/config_habitat_quickstart_v1.yaml
habit get-habitat --config config/habitat/config_habitat_quickstart_v1.yaml
The habitat maps, habitat_features.csv (volume fractions, MSI, ITH,
graph) and habitat_model.habitatmodel land in
demo_data/results/habitat_quickstart/. Look at one map:
habit view demo_data/preprocessed/images/subj001/LAP/WATER__WATER__Ax_Dyn_LAVA_Flex+C_Series0009.nrrd demo_data/results/habitat_quickstart/subj001_habitats.nrrd
habit view opens napari if installed (select the habitats Labels layer;
Contour 0 = filled regions); otherwise it writes a PNG. The figure
below is that PNG, written without opening a window:
habit view --backend matplotlib demo_data/preprocessed/images/subj001/LAP/WATER__WATER__Ax_Dyn_LAVA_Flex+C_Series0009.nrrd demo_data/results/habitat_quickstart/subj001_habitats.nrrd -o quickstart_cli_view.png --no-open
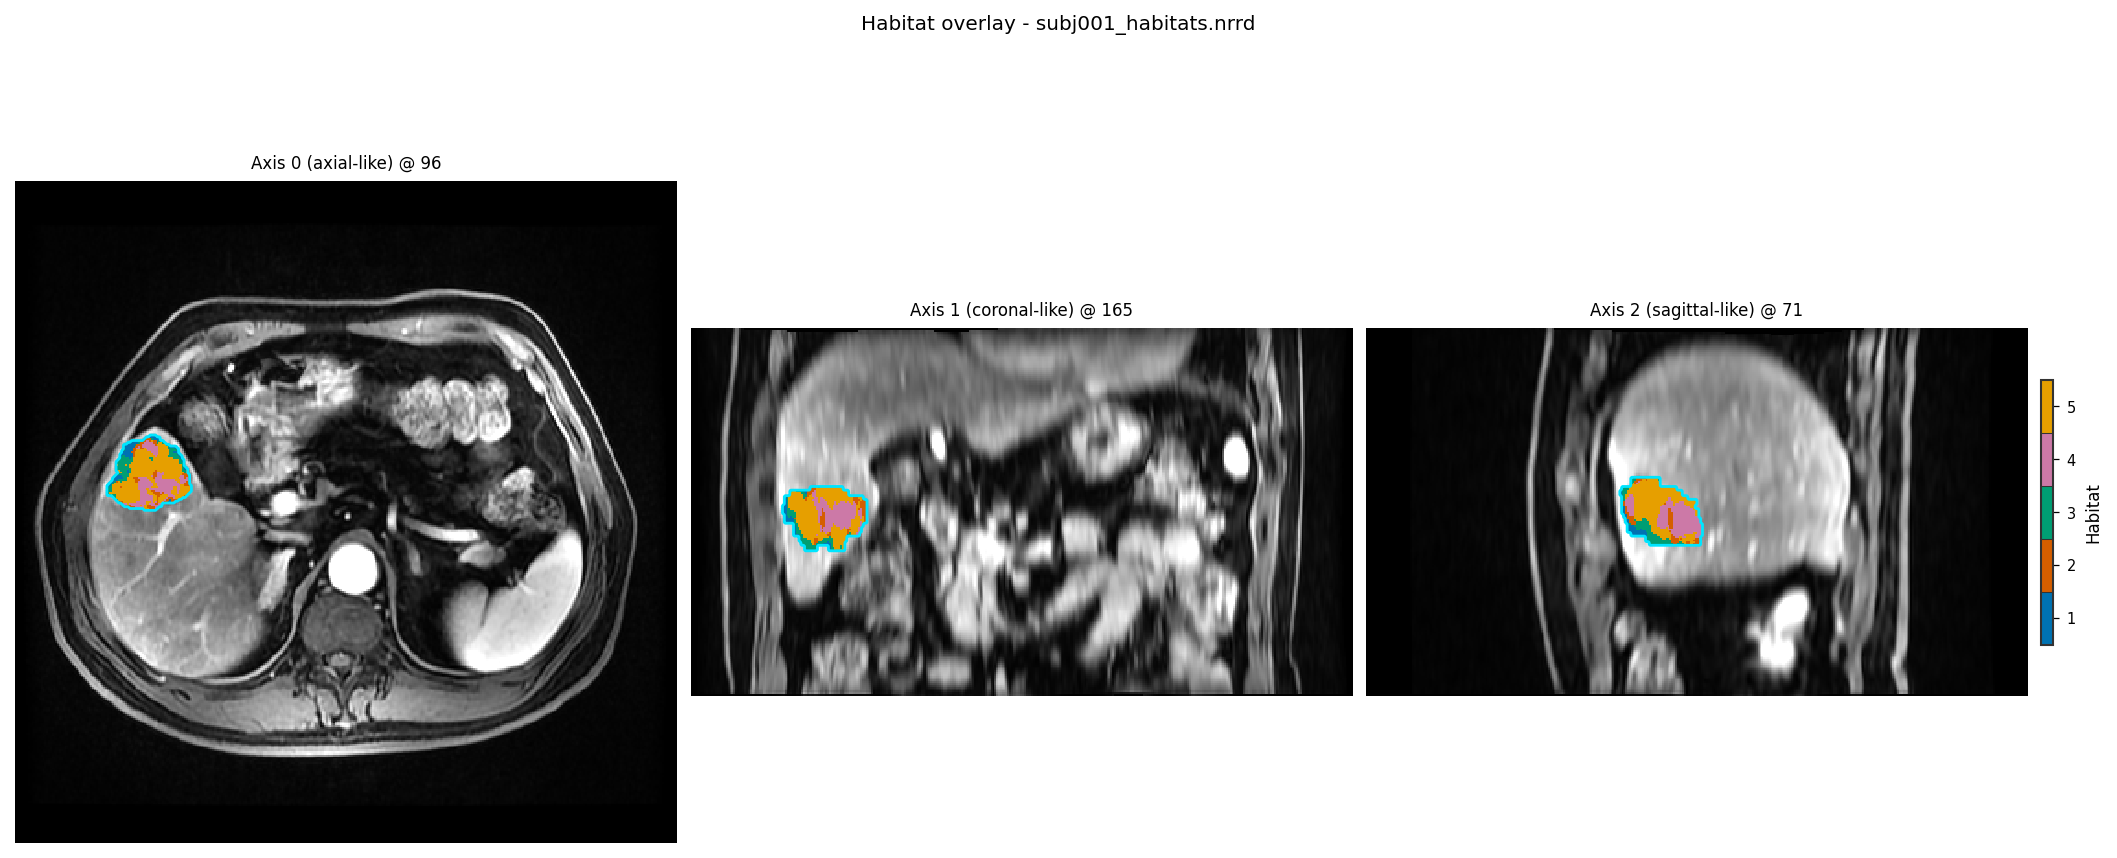
subj001 habitats from config_habitat_quickstart_v1.yaml.
config/habitat/config_habitat_two_step.yaml is a fuller two-step
configuration: per-subject winsorize and min-max scaling, cohort binning
(10 bins), 50 supervoxels, connected-component clean-up, seed 42, all
five subjects, ROI from the pre_contrast mask. It defines different
habitats by design; run it the same way:
habit get-habitat --config config/habitat/config_habitat_two_step.yaml
habit extract --config config/feature_extraction/config_extract_features_demo.yaml
habit extract reads the habitat maps that config_habitat_two_step.yaml
writes (demo_data/results/habitat_two_step/) and extracts volume, MSI,
ITH, and graph features. For parquet outputs, pip install pyarrow (see
Installation).
Next
Habitat Guide (Python): Habitat Guide
Habitat analysis (what / which strategy): Habitat analysis
Your own data: Load data
Python API (beginner
Study): Quickstart: Python APIEmbed one operator: Atomic operators
Parallel / fault tolerance: Parallel execution and fault tolerance
All commands: Command reference